Installation and Updates
RMT installation and updates are performed with the separate RMT Device Installer application.
The same installer is used both for first-time flashing of a new RMT and for later firmware updates.
RMT Device Installer is only for RepairMultiTool. For TGSN and other devices, use their own installation tools.
Requirements
- RMT Device Installer — download installer.
- A kuraga.tech account with RMT access. This is the same account used in MultiProg / TGSN.
- Internet on the installer computer — required for login, access check, firmware information, and firmware download.
- RMT connected to the computer over USB.
WiFi on the RMT itself is not required for installation or updates through RMT Device Installer.
If your account does not have RMT access, contact support. You can check RMT access in @KuragaTechBot. When RMT access is enabled, the bot shows RMT: активен, устройств: 1.
First Installation
Step 1. Start the Installer
Open RMT Device Installer.
If you are not logged in yet, the authorization page appears. Enter your kuraga.tech username and password and click Login.
After login, the installer checks whether RMT access is enabled for the account.
If access is not enabled, the installer shows the RMT access is not enabled page. Contact support, then click Check status again after access is enabled. If you need to log in with a different account, click Use another account.
If access is enabled, the installer opens the firmware installation page.
Step 2. Connect RMT
Click Install RMT. The connection page appears.
Connect RMT to the computer over USB and click OK, plugged.
The installer checks the connection and reads the hardware identifier from RMT.
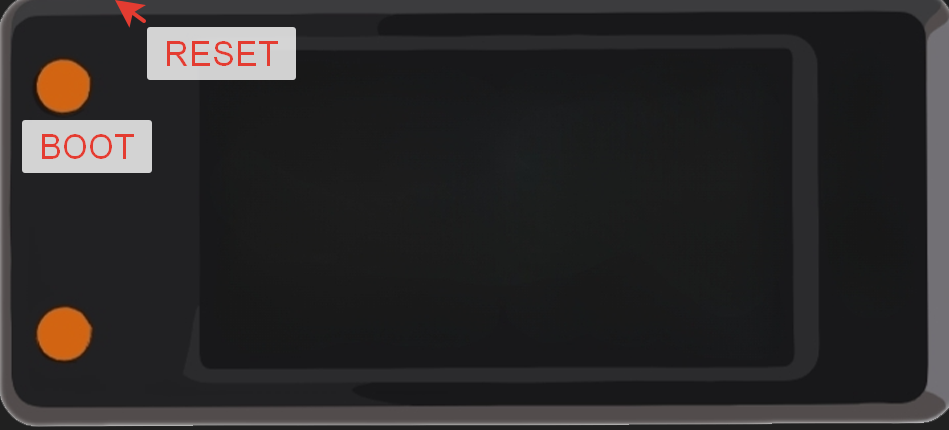
Put RMT into programming mode using the buttons:
- Hold BOOT.
- Press and release RESET.
- Release BOOT.
- Start installation again.
Step 3. Check Firmware Version
On the main installer page, check the firmware version field.
For a standard RMT account, the installer automatically selects the latest available RMT firmware. The version field is locked, and there is no refresh button.
If firmware version selection is enabled for your account, the version field is selectable. The refresh button next to the list requests the available versions from the server again. In most cases, select the latest available version.
Step 4. Install Firmware
Click Install.
The installer automatically:
- checks the connected RMT;
- registers or confirms the device on the server;
- prepares firmware for this specific RMT;
- downloads firmware if it is not available in the local cache;
- flashes the device;
- verifies the written data;
- sends the installation result to the server.
On the installation page you can see:
- firmware version — selected firmware version or the latest firmware selected automatically;
- progress bar — download, flashing, and verification progress;
- log — installer messages, errors, and diagnostic information.
Do not disconnect the USB cable or RMT power during flashing.
Step 5. Completion
After a successful installation, the log shows RMT firmware successfully flashed.
RMT is ready to work 🚀
Firmware Updates
No separate updater is needed: use the same RMT Device Installer.
Updating firmware uses the same flow as first installation:
- Open RMT Device Installer.
- Log in to your kuraga.tech account if the installer asks for authorization.
- Connect RMT over USB.
- Check the firmware version.
- If firmware version selection is enabled for your account, refresh the version list or select another version only when required.
- Click Install.
- Wait for flashing and verification to complete.
During update, the installer keeps the device binding and sends the update result to the server.
Beta Versions
Beta firmware is available only for accounts with beta access.
If beta access is enabled, you can select beta firmware installation from the context menu of OK, plugged on the connection page.
For a standard RMT account, beta mode installs the latest available beta firmware. If firmware version selection is enabled for your account, beta mode opens the beta firmware version list.
If access is not enabled, the installer shows Beta access required. If beta access is enabled but beta firmware is not available for the account, the installer shows Beta access unavailable.
What to Do if Something Goes Wrong
The messages below follow the RMT Device Installer dialogs/logs. Device ID wording is shortened in this guide.
| Installer message | What to do |
|---|---|
Login failed | Check username, password, and internet connection. If you forgot the password, use password recovery in the installer. |
RMT access is not enabled / RMT access is not enabled for this account. Please contact support. After support enables access, click Check status again. | The account does not have RMT access. Check the status in @KuragaTechBot and contact support. When support enables access, the bot shows RMT: активен, устройств: 1. Then click Check status again. |
Device installer access denied / Login succeeded, but device installation access was not granted. | The account passed login but RMT installation was not granted. Use another account or contact support. |
Session expired / The saved session is no longer valid. Please log in again. | Log in again with the kuraga.tech account. |
Beta access required / Your account does not have beta access, or the beta-status check failed. | The account does not have beta firmware access. Use stable firmware or contact support. |
Beta access unavailable / Beta firmware is not available for this account. | Beta access exists, but beta firmware is not available for this account. Use stable firmware or contact support. |
No firmware versions / No RMT firmware versions found on server. | Click the version-list refresh button. If the list is still empty, contact support. |
Failed on get versions list / Fail on get versions list | Check internet connection and refresh the version list again. |
No firmware selected / Please select firmware version first | Select a firmware version from the list and click Install again. |
Installer already in proccess | Wait for the current operation to finish. If the installer is stuck, restart it and repeat installation. |
Install in progress / Logout is disabled while installation is running. | Wait for installation to finish before logging out. |
Install failed / Failed connect to ESP32. Please hold BOOT, press RESET, release RESET, then release BOOT and retry. | Put RMT into programming mode with BOOT/RESET buttons and repeat installation. |
Install failed / Failed read ID from RMT | Check the USB cable, reconnect RMT, and repeat installation. |
RMT provisioning failed | The installer could not confirm the device on the server. Check internet connection and RMT installation access for the account. If it repeats, contact support with the log. |
FlashBootloader failed / Fw List empty! | The installer has no firmware information. Restart the installer, log in again, and repeat installation. |
FlashBootloader failed / Invalid firmware selection | The selected firmware entry is invalid. Refresh the firmware list or restart the installer. |
FlashBootloader failed / RMT provisioning data is missing | Device confirmation did not complete before flashing. Repeat installation; if it repeats, contact support with the log. |
FlashBootloader failed / Failed unpack downloaded firmware | Firmware unpacking failed. Repeat installation so the installer downloads the package again. |
FlashBootloader failed / Downloaded firmware validation failed | The downloaded firmware package did not pass validation. Repeat installation; if it repeats, contact support. |
FlashBootloader failed / Connected RMT ID does not match provisioned ID | A different RMT is connected than the one confirmed before flashing. Do not swap devices during installation; reconnect the correct RMT and repeat the process. |
FlashBootloader failed / Failed erase otadata | Flash preparation failed. Keep RMT connected, repeat installation, and contact support if it repeats. |
FlashBootloader failed / File open failed | A firmware file could not be opened. Repeat installation so the installer re-checks or re-downloads firmware. |
FlashBootloader failed / Failed parse partitions | The firmware package layout could not be read. Repeat installation; if it repeats, contact support. |
FlashBootloader failed / Flash write failed | Flash write failed. Check the USB cable, keep RMT powered, and repeat installation. |
FlashBootloader failed / Flash verification failed | Firmware verification failed. Repeat installation; if it repeats, attach the log when contacting support. |
FlashBootloader failed / RMT ID readback failed after flashing | The installer could not confirm RMT after flashing. Reconnect the device and repeat installation. |
RMT install report failed / Firmware was flashed, but the server did not accept the install report. | Firmware was flashed, but the result was not accepted by the server. Check internet connection, repeat installation, or contact support with the log. |